General setting FAQ
The purpose of caching is to speed up your website.
How does caching speed up a website? Normally, the page visited from a website has to be assembled from several components such as image files, program code and database entries each time it is visited. This takes different amounts of time depending on the complexity of the page and the number of visitors.
The page can be made faster by creating an already assembled copy that also no longer requires access to the database, which takes up most of the time. You can add compression to the copy to make the page even faster.
To ensure that published or updated events are visible on your website, the caches must be renewed, as otherwise the old copy of your website will still be displayed to visitors.
The caches of the HYROX websites are refreshed every two hours.
For important launches or sales, clear it manually:
- Single-language websites:
Top black menu > WP Rocket > Clear and preload cache - Multilingual websites:
Top black menu > WP Rocket > Clear and preload cache > All languages
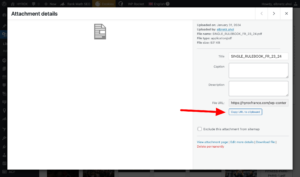
- In the backend of your website, click on “Library” in the menu on the left under “Media”.
- Click on the “Add new Media File” button at the top.
- Upload the file.
- Click on the uploaded file
- Click on “Copy URL to clipboard”
- Go to the desired page, search for the corresponding link or button, and replace the link.
There is a global HYROX website: hyrox.com – from here, users can switch to the local websites using the flag popup.
Some countries have their own HYROX websites – these are called local websites.
Some of these local websites offer multiple languages. Maintaining and translating these sites is the responsibility of the respective local teams.
Special case – Events: All HYROX websites include events. These events are managed centrally through maintain.hyrox.com.
Event FAQ
The date format 20241012 is a technical date format and can be ignored.
There are different date formats worldwide. When the events are transferred to the local websites, the date formats are adapted to the local conditions.
What we need to know to set up a new waiting list for your event is:
- From when till when do you need the preregistration form on the frontpage
- Which event is it all about (It needs firstly be set up under https://maintain.hyrox.com/
- If now Event is set up yet, we need to know the date of the event
- We need to know the correct ActiveCampaign List
Here on maintain.hyrox.com, event managers create and continuously update events.
They enter all available information into a form and also manage the sales status from here.
From this platform, events are distributed to all HYROX websites four times per day. This process takes about 15 minutes, depending on the size of the changes. What happens during this time?
- Export: Events are saved into a table from maintain.hyrox.com.
- Import: 10 minutes later, all local websites access this table simultaneously and compare the current state with the table.
Depending on what’s changed:
- New events are created.
- Changes to existing events are updated.
- No changes? The event is skipped.
Translation – only for multilingual websites: All events are always available in English across all languages until:
- Relevant events for the region are translated using the plus icon.
Events can be saved as Draft, Scheduled, or Published/Updated. What does each mean?
- Draft: The event is still under construction and excluded from export. Event managers can build it without pressure.
- Scheduled: You can set a publication date in the right-hand column. Scheduled events are exported, but remain invisible until the set time/date.
- Publish: The event becomes visible on all HYROX websites after export. It’s live – regardless of sales status.
- Update: This option appears when a published event has been edited and needs saving.
All changes saved at least 5 minutes before export are included.
Export & import times follow Berlin time:
Export | Import |
---|---|
05:45 am | 05:55 am |
11:45 am | 11:55 am |
05:45 pm | 05:55 pm |
11:45 pm | 11:55 pm |
⚠️ Currently, export/import happens one hour later than listed above.
Import finishes within 15 minutes. From then, English content is available, and local translations can be adjusted.
IMPORTANT: The time zone for all HYROX hosted websites is Berlin (UTC+1, during summer applies UTC+2). Please check the current time in Berlin for comparison to your time zone.
The export from this maintain platform to the local websites will automatically take place every 6 hours at 11:45PM, 5:45AM, 11:45AM, 05:45PM daily (Berlin time).
The import into the local websites occurs 10 minutes later: 11:55PM, 5:55AM, 11:55AM, 05:55PM.
In addition, the caches on the local websites are automatically regenerated every 2 hours. This means that the events/changes are visible on the websites no later than two hours after the import.
To ensure exact timing, you can manually empty the cache at the exact launch time on your local website.
💡 For event launches, it’s smart to schedule the event one day early so it’s already distributed and ready. Use the “Schedule” function to do this.
Important: Avoid any last-minute changes on launch day!
Time zones: Always refer to Berlin time (Winter: UTC+1 / Summer: UTC+2).
Example
You want your Amsterdam event to be visible as a “Coming Soon” event on June 17, 2025 at 7:00 PM:
- You create the event on maintain.hyrox.com with all necessary info and save it as a Draft.
- You finalize the event by June 16, 2025 at 3:00 PM, then change its status to Scheduled for June 17, 2025 at 7:00 PM.
- It will be distributed to all websites during the next export (around 6:00 PM).
- On your local site (e.g. hyroxnetherlands.com), you can now create the translation for the scheduled event (using the plus icon).
- The event (and its translation) will be live at the scheduled time.
Clear the local cache to be safe (see tab Caching).
💡 Vivenu handles the countdown to ticket sales. If the “Register now” button appears early, that’s actually helpful!
Update the Event Sale Status at least 2 export cycles before the ticket sale begins:
- Set Event Sale Status > Event Status (live/sold out) to “Event sale is live (Registration popup is displayed)”
- Under Event Registration, select the method (usually Vivenu) and enter the registration link.
Avoid last-minute changes — they might not get exported in time!
Example
You want the Rome event ticket sale to begin on August 24, 2025 at 3:00 PM:
- Look at the export times. Don’t use the last export before 3:00 PM — choose at least two before.
- Make your changes by 5:40 AM on August 24, 2025.
- Set Event Sale Status to “Event sale is live”, insert the registration link, and click update.
- With the next export (05:45 am), the change will be distributed across all websites.
- If you have changed texts, you now have enough time (at least 6 hours) to adjust the translation on your local website (hyroxitaly.com).
- Since the cache clears automatically every 2 hours, you can simply wait or, to be sure, manually clear the cache on your local website (see tab Caching).
A new option allows events to be shown as “Coming Soon”, either when:
- No date is available yet, or
- The ticket sale hasn’t started.
Settings:
- No date?
In the event backend under General Important Setting > What type of event? select “Coming Soon”. - Date set, but no ticket sale?
Set Event Sale Status > Event status (live/sold out) to “Event sale is coming soon”.
Important: These settings directly affect event functionality and button displays in teasers!
Landingpage FAQ
To prevent a page from being found on Google, follow the steps below:
- On the relevant page, scroll all the way down to the “Rank Math SEO” section
- Click on the “Advanced” tab here
- Check at least “No Index”. To be on the safe side, also check the other boxes displayed.
Important to know:
This setting is information that all major search engines adhere to. However, it does not mean that the page cannot be found on the Internet. This method is therefore not sufficient to protect confidential information.
- In the backend of your website, click on “Library” in the menu on the left under “Media”.
- Click on the “Add new Media File” button at the top.
- Upload the file.
- Click on the uploaded file
- Click on “Copy URL to clipboard”
- Go to the desired page, search for the corresponding link or button, and replace the link.